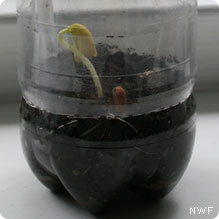
Create your own garden in a soda bottle!
What You Need
- Permanent black marker
- 1 cup peat (optional)
- Very sharp scissors or craft knife
- Seeds or dried beans
- 5-10 small rocks
- Plastic 2 liter soda bottle with cap
- 2 cups dirt or potting soil
- 1/4 cup water
What You Do
- Prepare bottle.
Remove the label from the bottle. Discard label. Save cap! Wash and rinse out the bottle and cap. Draw a line on the bottle about 1/3 of the way up with the marker. Cut along that line so the bottle is in two pieces. - Put in rocks, peat and soil.
Put a few rocks in the bottom for drainage. Then pour in the peat. Peat is optional but it does give the roots more space to breathe. Lightly pour in the dirt or potting soil. - Plant the seeds or beans.
Push down with your finger in the soil to make a hole at an appropriate depth for the seeds or beans. It says on the seed packet whether to just sprinkle the seeds on the surface or put them deeper down. For dried beans, they need to be just below the surface of the soil. - Water the soil and close the bottle.
Lightly spray the soil with water.Slide the top of the bottle over the bottom, so they overlap slightly. Make sure you have left the cap on the bottle to keep a moist environment in the bottle.
- Place in sun.
Place in a sunny spot and watch for your seeds to grow! If you chose dried beans, you should see at least a tiny plant growing within two days.Remember to spray a bit of water in the terrarium if it looks dry, but it should have enough water for a week.
- Transplant your plant outdoors when it is too big for the terrarium.
If you chose a dried bean, your plant will grow too large for the terrarium in less than a week. You could eat the sprout that comes off – it’s a yummy bean sprout.


