Make simple bird ornaments from watercolor paper using skills the pre-schoolers love – squirting water and using eye droppers.
What You Need
- Aprons
- Construction paper
- Eye droppers (one per child)
- Food coloring
- Glue stick
- Markers or crayons
- Paper towels or cloths for clean-up
- Large grain salt
- Small plastic cups, such as muffin packaging
- Squirt bottle, ideally small sized for children’s hands
- String or yarn
- Water
- Watercolor paper
What You Do
- Before the kids are around, prepare the watercolor bird shapes and parts.
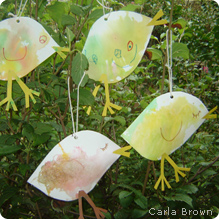
From one 10×12 sheet of watercolor paper, you can make four birds. Divide the sheet in four pieces and trim the rectangles into leaf shapes.
Use a hole punch to make a hole near the “head” of each bird.
String a small piece of yarn or string through the hole for hanging the bird.
Cut from the construction paper some feet and beaks.
Fill a squirt bottle with water. - Set up the work area.
Everyone should put on aprons to protect their clothing, ideally waterproof ones.
Using the squirt bottle, encourage the kids to squirt a few tablespoons of water in each plastic cup, one for each color of food coloring.
Put one drop of food coloring in each cup. You don’t need much. - Have each child squirt their bird with some water.
They will tend to make the birds too wet, so you could start by saying “five squirts.” Ideally the paper is all wet but not in a puddle.
- Give each child an eye dropper and they can now drip colors on their bird.
Again, the birds will be more “cute” if they use the color sparingly, but using the eye dropper is so much fun, it can be difficult for children to hold back.
If the birds are not too wet, you can try sprinkling large grain salt on the paint. This soaks up the paint and can make a pretty pattern. If the birds are too wet, then the salt will stick to the paint and create some texture.
- Hang up the birds to dry, then draw and glue details on the birds.
This can take about 30 minutes, depending on how wet the birds are, so plan another activity or read a book while this happens.
Once the birds are dry, the kids can draw an eye, wing or other details on the birds. They can use the glue stick to attach legs and a beak. Older children might be able to design their own legs, beaks and wings from construction paper, but for younger children, it’s enough challenge just to use the glue stick.
If the kids want, they can also use child-friendly scissors to cut small “feathers” in the tail.
- Decorate your house or trees with the birds.
What a cheery decoration on a cloudy day!


