Save your pennies with this recycled turtle bank.
What You Need
- 1 oval shape (cut out of cardboard; about the size of an egg)
- Craft glue or glue dots (available in the scrap-booking section of most craft stores)
- 2 googly eyes
- Green, red, and yellow tempera paint
- Paintbrush
- 2 paper plates
- 1 clear plastic cover (about 6 inches in diameter, the type used at take-out salad bars)
- 1 quarter coin
- Scissors
- 6 wooden ice cream spoons
What You Do
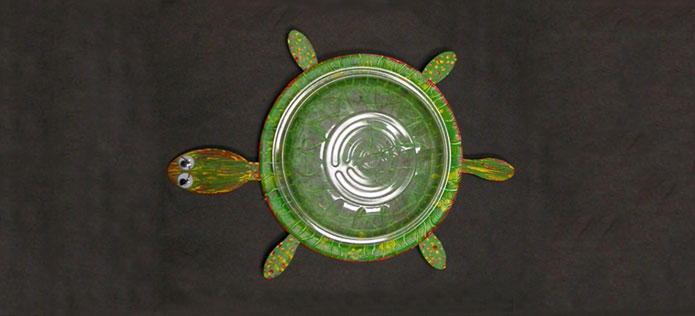
- Paint Paper Plates
Paint the backs of two paper plates green. Dab on red and yellow markings as shown in the photo. Optional: While the paint is wet, use the edge of a quarter to etch in a shell pattern. - Paint Turtle’s Feet
Paint the oval ends of four ice cream spoons green. Add red and yellow dots as shown. - Paint Turtle’s Neck and Tail
Paint the oval ends of two ice cream spoons green. Add red and yellow streaks. - Paint Turtle’s Head
- For the turtle’s head: Paint the cardboard oval green. Add red and yellow streaks.
- Let all painted objects dry thoroughly.
- Assemble Turtle
- Glue the feet, tail, and neck in place on the inside of one paper plate. Let dry. This will form the turtle’s bottom half.
- Glue the remaining paper plate on top of the turtle’s bottom half to make the complete body.
- Glue the turtle’s head on top of its neck. Glue wiggly eyes on the head.
- Cut Out Coin Slot
Use scissors to cut a quarter-size hole in the top of the clear plastic cover. This will be the bank’s coin slot. Glue the plastic cover on top of the turtle’s back.
