Design your own starlight lantern or luminaria from a recycled can.
What You Need
- Candle – small one such as a tea light
- Freezer
- Hammer
- Match
- Metal can
- Large nail
- Paper long enough to wrap around the can
- Pencil
- Scissors
- Tape
- Towel
- Water
- Work glove (optional)
What You Do
- Cut the paper so it wraps around the can.
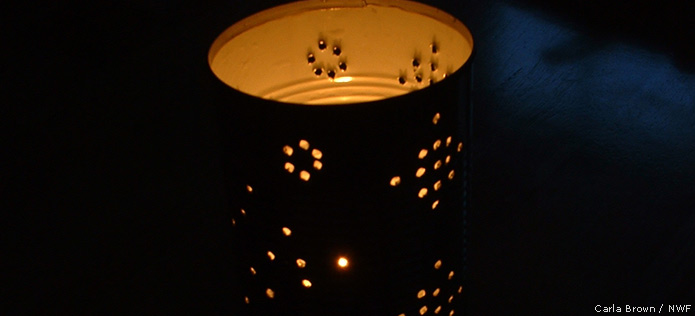
Use your pencil to draw a pretty design on the paper made of dots. Don’t put the dots too close together. You could make designs like stars or flowers, and repeat them to make a pattern. - Fill the can with water and put it in the freezer
The water forms into ice. The ice allows you to hammer out the pattern in your can without causing the can to dent in.
- Once the ice is frozen, take the can out of the freezer.
Tape your design around the can.
Put down a towel on your table to protect the working surface and keep the can from rolling around.
You can wear a work glove on one hand to hold the can so your hand doesn’t get too cold.
- Tape a large nail into each dot on your pattern.
If you have a complex pattern, you might find that the ice starts to melt, and some water will come out and make your pattern wet. So you might need to re-freeze the can periodically in the case.
- When your pattern is all tapped, let the ice melt out of your can.
Light a small candle and put it in your can.
If you make more than one luminaria, it can be a romantic touch for a night-time picnic. Or welcome night time visitors as they walk to your door.
You can make spooky themed ones for Halloween too.